Writing an NES emulator in Haskell
Can the functional programming paradigm help implementing emulators ?
Introduction
I wrote my first line of Haskell code five years ago. But it’s only been a year and a half since I started working with the language daily (as part of my PhD work). Therefore, most of my history with Haskell can be summarised by school projects (e.g. JSON Parser, a Lisp interpreter) and research experiments (e.g. packed-data, type-machine). I hadn’t had the opportunity to work on larger scale projects using Haskell (yet).
The Haskell community has this very interesting trait of using the language in applications for which, at first glance, the functional paradigm’s relevance isn’t obvious. After a quick search on GitHub, you can find surprising projects such as a gamepad emulator (monpad) or a CLI music tagger (htagcli).
Me too, I wanted to be a real Haskeller and have a really cool project to show off. So I came up with an idea: I wanted to see how feasible it would be to implement a video game console emulator in Haskell. The main ‘research’ questions would be the following:
- Would the functional paradigm get in the way of the implementation, or help model the console’s behaviour?
- Is it possible to leverage an acceptable frame rate (i.e. at least 25fps) despite how high-level Haskell in regard to memory management.
To play it safe, I decided to go for one of the oldest/’simplest’ video game console, the Nintendo Entertainment System (aka NES), home to the first Super Mario Bros and Legend of Zelda games. Thus was born FuNes, an experimental NES emulator written in Haskell. (Source code).
In this blog article, I’ll report my experience with this little adventure. First, I’ll quickly introduce the console’s architecture, then present (at a very high level) how I designed and put each component together. I’ll also explain how I managed to optimise the performance of the emulator. In the conclusion, I’ll answer the questions presented earlier.
A little PSA before we get started:
- The goal was to implement a 100% compliant emulator, but only to have one working with a couple of titles (in this case, Super Mario Bros. and Pac-Man).
- This is not a guide on how to implement an NES emulator. Despite its age, the console is an incredibly complex system. I will go over some technicality very grossly for the sake of conciseness. If you are curious, I recommend the
Writing an NES Emulator in Rustebook and thenesdev.orgwebsite. If you prefer watching videos, and just want to get a taste of the complexity of the system, I recommend100thCoin’s YouTube channel.
The NES Architecture
We first need to look into the NES’ component and understand what they do and how they interact with each other.
The component that is the easiest to understand is the Central Processing Unit (CPU). Its role is to read and execute code. It has 4 registers, as well as a program counter to keep track of the next opcode (i.e. instruction code) to execute.
To interact with the memory and the other components of the console, the CPU is connected to a Bus1, which will acts like a driver when interacting with memory, and pipes transfered data to the correct component. For example, if the CPU wants to read data at address 0x2000, the Bus will retrieve a value from the PPU. But if the CPU reads from address 0x8000, the Bus reads a value the cartridge.
The Picture Processing Unit (PPU) is responsible for drawing the background and the sprites, and handle scrolling. Just like the CPU, it has its own registers and some dedicated RAM.
The last processing unit in the console is dedicated to audio (APU). Technically, it is a particular component as it is actually part of the CPU. However, most of the emulators implement it as a standalone component, as the CPU interacts with the APU using the Bus. It also has its own internal state.
Finally, we have the game controller (aka Joypad) and the Cartridge. Just like everything else, the CPU interacts with them by reading data at dedicated address spaces, which will be mapped to the corresponding component by the Bus.
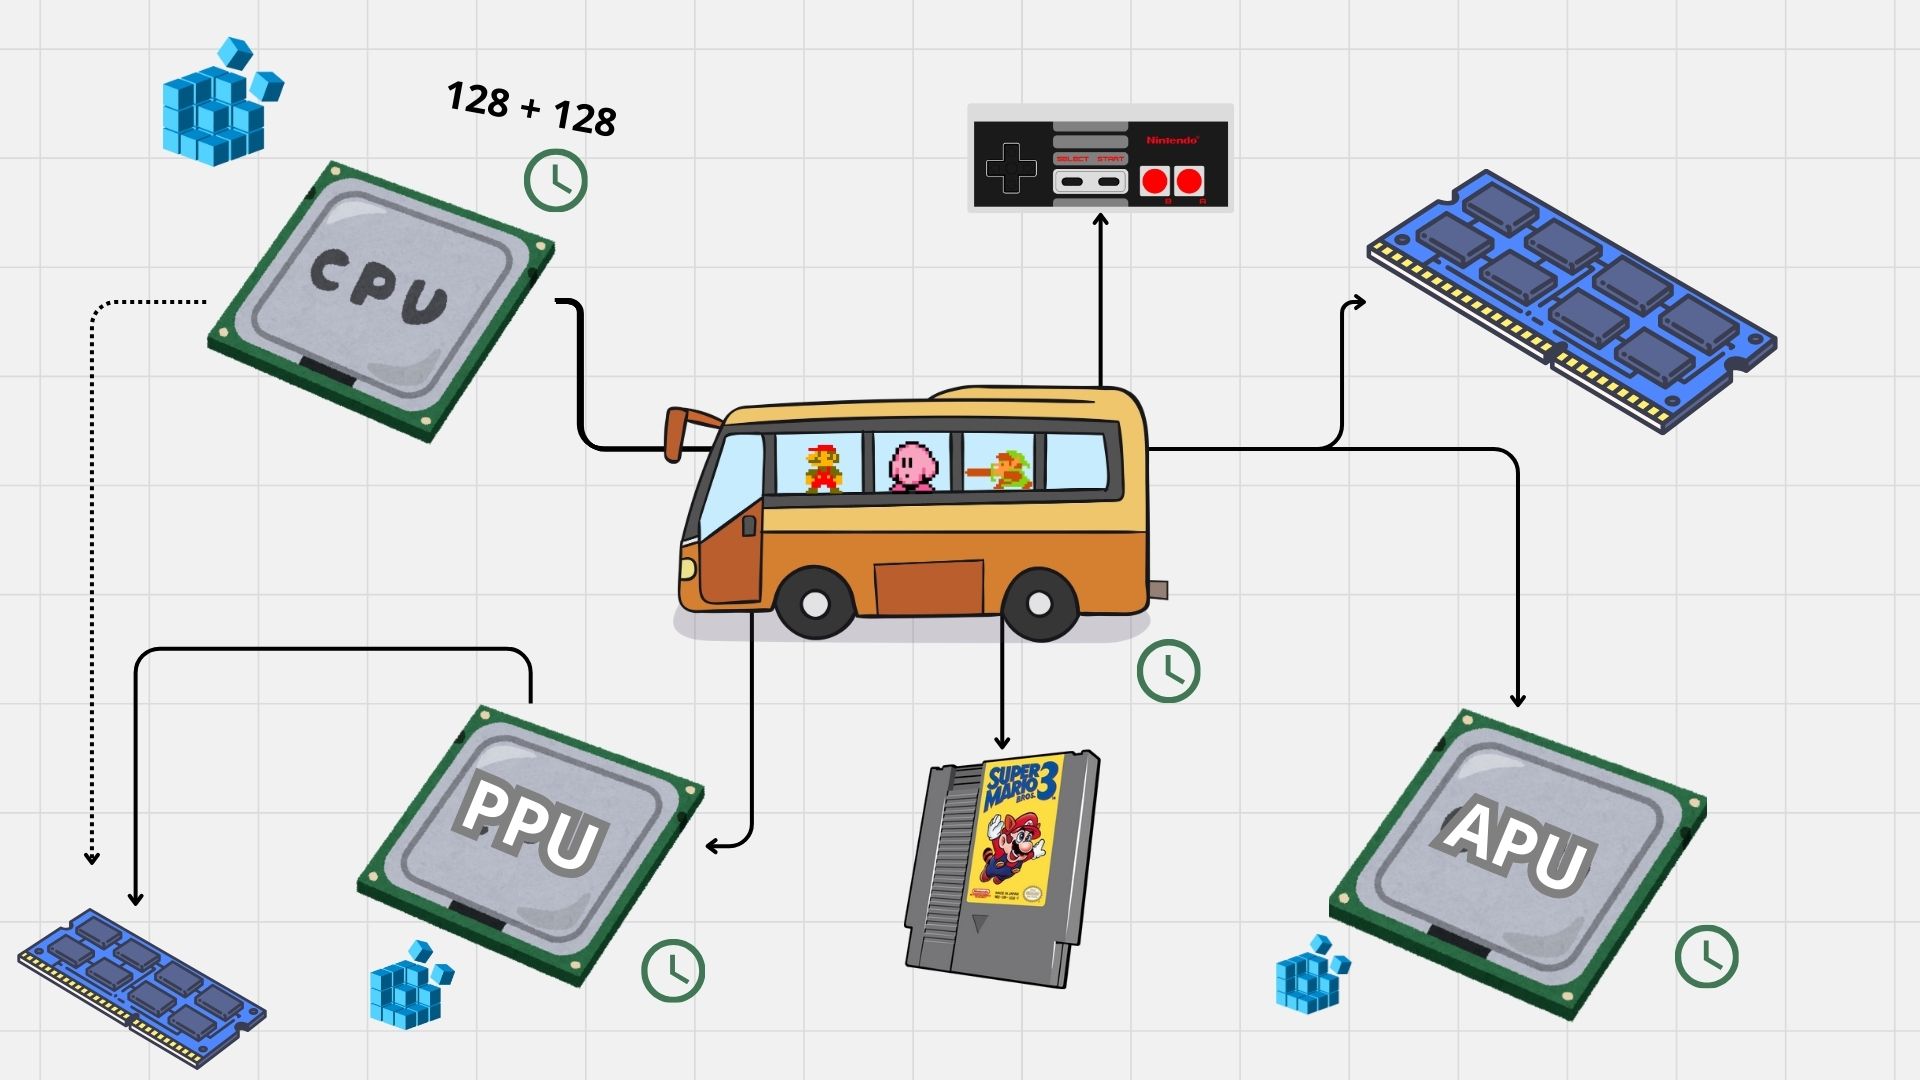 Components of the NES and their relations
I won’t dive too deep into the technicalities. However, one final thing to mention is that components can have side effects on each other: for example, when the PPU or APU loads a big chunk of data from the CPU’s VRAM (OAM), it causes the CPU to halt for a couple of cycles. Alternatively, some operations can cause a CPU Interrupt, causing it to stop its execution flow and run a given sequence of instructions.
This should be enough to understand the design choices made in the emulator. Again, if you are curious, feel free to check out the sources linked in the introduction.
Implementation
Computations
We saw in the previous section that each processing unit has its own internal state. This state gets updated after each tick (smallest unit of time). In Haskell, the ubiquitous way to model a computation that updates a state is to use a State monad, or worded more simply, a function that takes a state and returns the new state.
In the emulator, each processing unit computation is defined as something like this:
1
2
3
4
-- The internal state of the CPU
data CPUState = ...

data CPU a = MkCPU (State -> (State, a))
And PU-specific computations can be defined like this:
1
2
3
incrementRegisterA :: CPU ()
tick :: APU ()
readStatus :: PPU Byte
Interacting with the State
As we saw, for each processing unit, we define a state object. For the CPU, it would be something like this:
1
2
3
4
5
6
7
8
data CPUState =  MkC {
    registerA :: Byte -- AKA accumulator, 1 byte
  , registerX :: Byte
  , registerY :: Byte
  , registerS :: Byte -- AKA Stack pointer
  , status :: StatusRegister
  , pc :: Addr -- Program counter, 2 bytes
}
To access or update a field from within a CPU computation, we can naively define the following functions:
1
2
withState :: (CPUState -> a) -> CPU a
modifyState :: (CPUState -> CPUState) -> CPU ()
For example, an opcode which increments the value in the A register could be implemented like this.
1
2
3
4
inc ::  CPU r ()
inc  = do
  regA <- withState registerA
  modifyState $ \st -> st{registerA = regA + 1}
It looks good… until the very last line. The lambda is quite verbose. In the case of complex updates, the readability is greatly impacted.
In my opinion, Haskell is not a very good language when it comes to working with records (out of the box). Fortunately, we can fix this using lenses. With a little boilerplate, we can get access to a wide array of operators that allow updating the state in a more imperative style. Using lenses, the implementation of inc looks immediately nicer:
1
2
3
4
5
6
7
8
9
10
11
12
13
14
15
16
17
18
19
20
data CPUState =  MkC {
  _registerA :: Byte, _registerX :: Byte, -- etc.
}

-- Boilerplate that generates lenses for each field in the state
makeLenses ''CPUState

inc ::  CPU r ()
inc = do
  regA <- use registerA
  modifying registerA (regA + 1)

-- We can go even further with the many infix operators available
inc = do
  regA <- use registerA
  registerA .= (regA + 1)
-- or
inc = registerA %= (+ 1)
-- or
inc = registerA += 1
That’s way better than using our ugly with/modifyState functions
Side effects
The dirty and quick way to handle cross-processing-unit side effects is to use global variables. However, Haskell being a pure language, globals are a no-no.
But the emulator being mainly single threaded, it is easy to pass around each processing unit a ‘side effect’ state that says whether a specific side effect should be happening. Fortunately for us, it is easy to extend the computation monads so that they also carry this additional state:
1
data CPU a = MkCPU (State -> SideEffect -> (State, SideEffect, a))
We can easily access this state in monadic computations when the processing unit is given control back:
1
2
3
4
5
6
7
8
getSEState :: CPU SideEffect
setSEState :: SideEffect -> CPU ()

tick :: CPU ()
tick = do
  interrupt <- shouldInterrupt <$> getSEState
  when interrupt $ do
    setSEState $ \st -> st{shouldInterrupt = False}
Of course, we could use lenses to make the interactions with that state easier.
Single-threading the processing units
On an actual NES hardware, obviously, processing units run in parallel. But entry-level emulators usually rely on a single thread of execution. To make sure the processing units stay in sync, we can decide of a ‘master’ processing unit. When this master PU ticks, it gives control (for the duration of one tick) to each of the other processing units. Using the CPU as the master PU, we can leverage its connection with the Bus and turn the latter into a ‘tick controller’ which is in charge of making the other PUs tick for us. Here’s a concrete example:
- The CPU wants to read a byte from VRAM.
- Read operations last one tick. Therefore, the CPU ticks.
- When the CPU ticks, we call a function that, through the Bus, makes the other PUs tick.
- For example, during this tick, the PPU could draw a single pixel, and the APU could update its internal state.
- Once the PPU and APU are done with their task, control is given back to the CPU.
- The CPU receives the bytes is asked for.
Performance
Now, we need to be realistic: the functional modelling of such computations are not ideal, as for each step in the computation, we basically create a new state object. If we want to make the emulator fast enough to run games at an acceptable frame rate, I ended up tweaking a few things about the emulator’s architecture.
First, all processing-unit-computations were redefined using a continuation-passing style (CPS):
1
data CPU r a = MkCPU (State -> SideEffect -> (State -> SideEffect -> a -> r) r)
Notice the additional type parameter r. It might seem annoying at first to add a type parameter for each CPU functions, but it is relatively unobtrusive (and thankfully for me, I adopted CPS pretty early on). The most annoying part however is to update all the class instances for each xPU monad, as having to apply each variable to the continuation weightens the code.
1
2
3
4
5
instance Applicative (CPU r) where
    pure a = MkCPU $ \se bus cont -> cont se bus a
    (MkCPU f) <*> (MkCPU a) = MkCPU $ \se bus cont -> f se bus $
        \se' prog' f' -> a se' prog' $
            \se'' prog'' a' -> cont se'' prog'' $ f' a'
Secondly, since the NES’ computations do not leverage any of the laziness enabled by Haskell, we can make all the fields of the state objects strict, and use bang patterns everywhere to make sure that scalar values are fully evaluated. Or we can be lazy (pun intended) and use the -XStrict compiler option :)
Finally, some computations can be run in the background, as we do not need any resulting values right away. This is applicable to the function that render the pixel buffer and mix audio. For such functions, we make the calling operation actually call an IO function. This function typically writes a value to an MVar which will be processed by a dedicated thread. If the threaded computation returns a value, it is written into an output MVar. Using threads really helped improve the performance of the emulator.
Video Demos
The following video demos show the speed-ups obtained. While the performance are not perfect, this is a much more acceptable frame rate.
These videos have audio. Make sure to turn down the volume before playing them.
Using a single thread
Using multiple threads
Testing
Even though the NES is an old system, it is nonetheless a complex one. Thus, testing is primordial.
One advantage of the functional paradigm and purity is that they make components easy to tests. Therefore, it is easy to attach the CPU and PPU to a given state and a sequence of NES instructions to test their behaviour. Here’s what a unit test for a single opcode looks like:
1
2
3
4
5
6
7
it "Push and Pull Register A" $ do
    -- Push Reg A, set it to 0x10, and restore it from stack
    let program = [0x48, 0xa9, 0x10, 0x68, 0x00]
        st = newCPUState{_registerA = 1}
    withState program st $ \st' -> do
        _registerA st' `shouldBe` 1
        _registerS st' `shouldBe` stackReset
Testing individual opcodes can help, but considering how many there are (256), it would be a waste of time to test them all thoroughly2. Thankfully, the community around NES development and emulation came up with a collection of testing ROMs to test emulators’ behaviours. For example, Nestest is an NES ROM that executes all official opcodes in almost every combination possible (i.e. testing all the possible side effects) and comes with a log tracing the state of the CPU (the registers, the program counter, etc.) after each instruction. If we manage to inject a logger into the emulator and generate a similar logtrace, we can easily write an automated test that looks for differences betweens the excepted and the generated traces.
1
2
3
4
5
6
7
C000  4C F5 C5  JMP $C5F5                       A:00 X:00 Y:00 P:24 SP:FD PPU:  0, 21 CYC:7
C5F5  A2 00     LDX #$00                        A:00 X:00 Y:00 P:24 SP:FD PPU:  0, 30 CYC:10
C5F7  86 00     STX $00 = 00                    A:00 X:00 Y:00 P:26 SP:FD PPU:  0, 36 CYC:12
C5F9  86 10     STX $10 = 00                    A:00 X:00 Y:00 P:26 SP:FD PPU:  0, 45 CYC:15
C5FB  86 11     STX $11 = 00                    A:00 X:00 Y:00 P:26 SP:FD PPU:  0, 54 CYC:18
C5FD  20 2D C7  JSR $C72D                       A:00 X:00 Y:00 P:26 SP:FD PPU:  0, 63 CYC:21
C72D  EA        NOP                             A:00 X:00 Y:00 P:26 SP:FB PPU:  0, 81 CYC:27
Excerpt from the logtrace
Other ROMs test the behaviour of the processing units and report errors directly on the screen. This is what the AccuracyCoin test suite by 100thCoin does. While running these tests is not as automate-able, they can provide useful insight on some edge-cases and alternative behaviour.
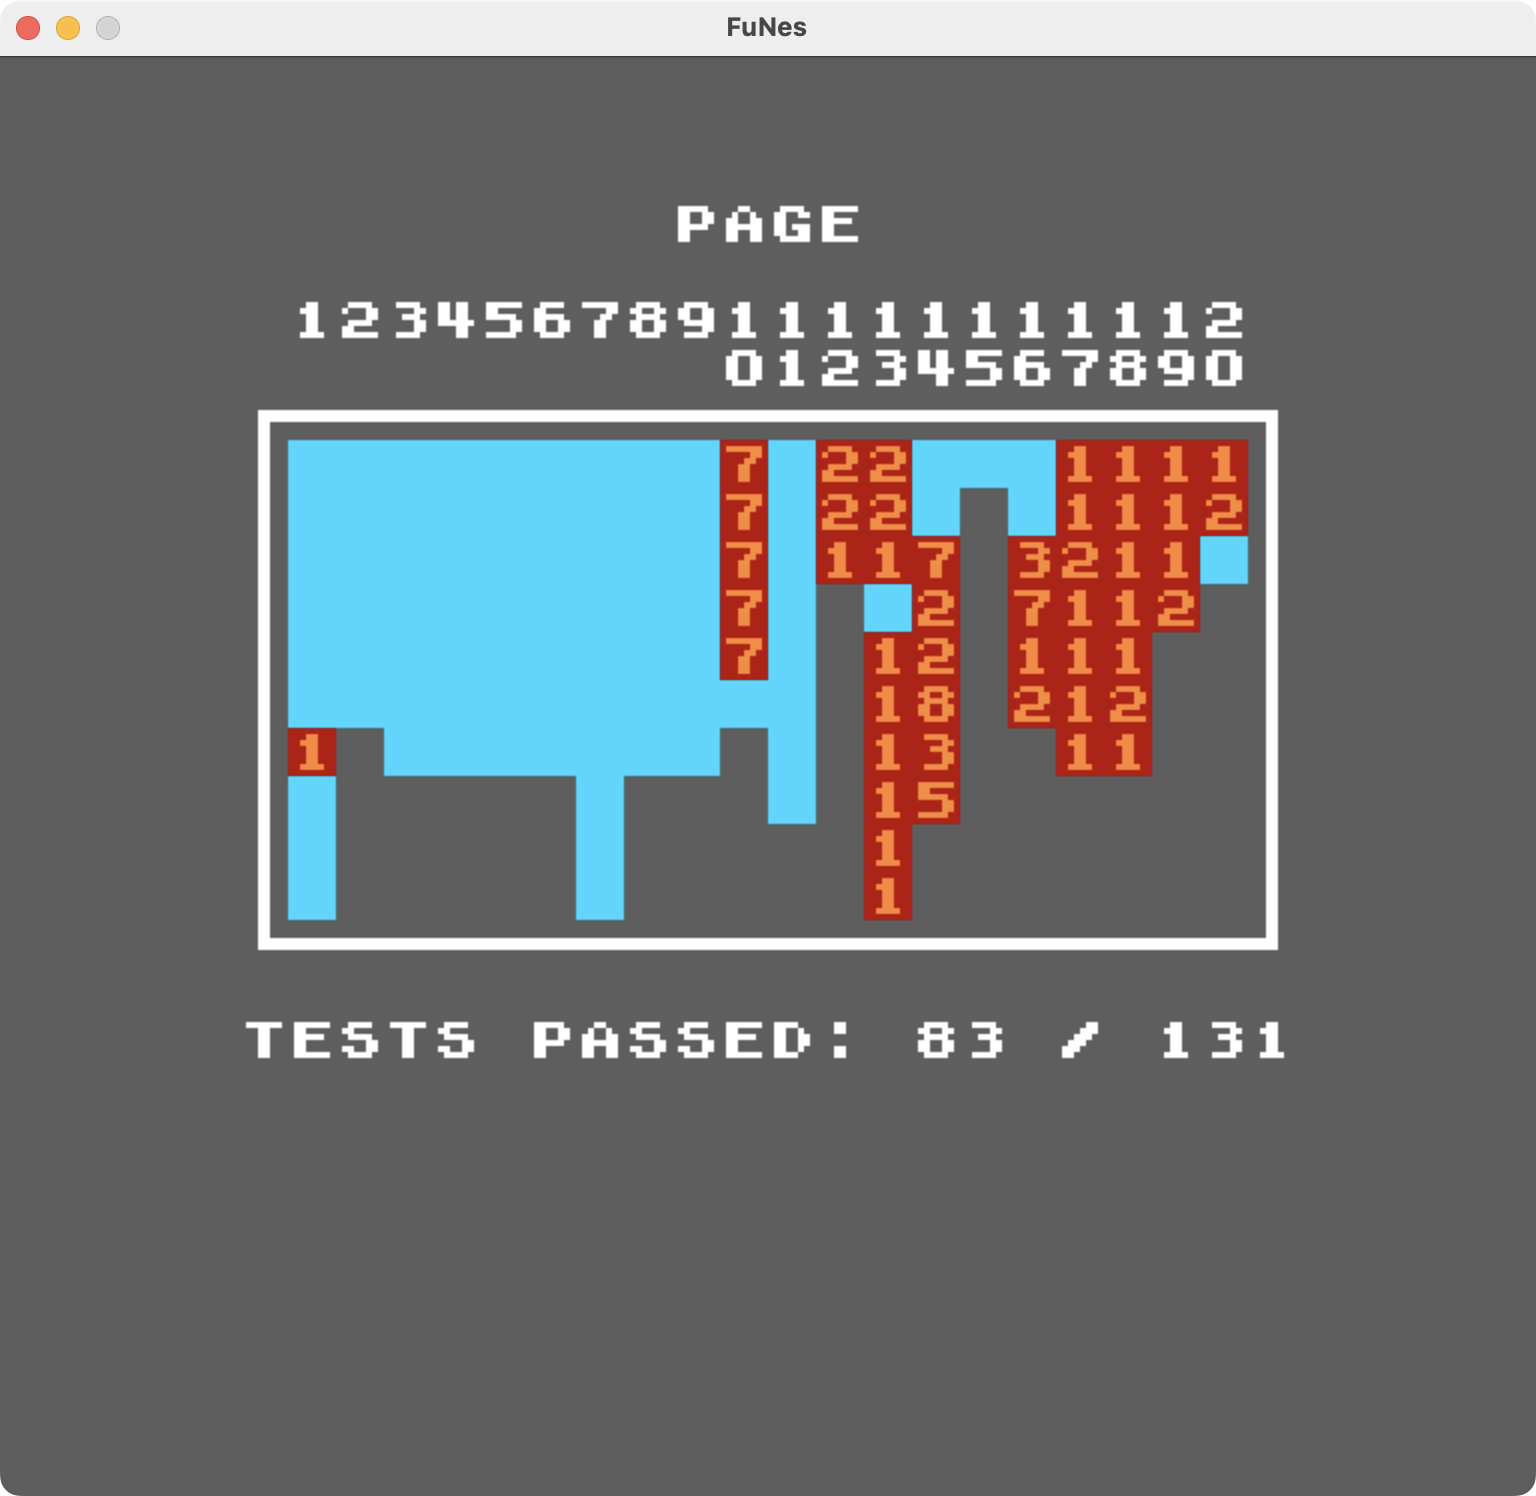 Test results from the AccuracyCoin ROM for FuNes
Conclusion
To summarise, here’s what I learnt from this project. Well, first off, the NES is a surprisingly complex system, but the extensive documentation online as well as the community around it really made researching for this project a bliss.
Surprisingly, the functional paradigm never got in the way when implementing the emulator. The biggest drawback was the impossibility of using global states. Thankfully, this can be overcome by passing around an additional side-effect-state. Additionally, considering how high-level Haskell is, we quickly end up having to optimise the code to get an acceptable frame rate.
So, as a conclusion, I would say that Haskell isn’t totally a bad idea for such projects. The functional paradigm and purity make modelling and testing easy, but the actual code ends up looking really imperative. I ended not using making of Haskell’s killer features (e.g. disabled laziness). However, the lack of low-level memory management (especially for states) sometimes made me regret not going for a languages like C or Rust.